My points had dwell angles of 157, 157, 160 and 160 which is regarded as too high. I tried to reduce the angles by bending the mounts for the rubbing blocks but one of the block crumbled so a rebuild was now needed.
I got a spare set of rubbing blocks from @Mr Good Car – he has a listing in the classifieds see here: FS D Jet Parts
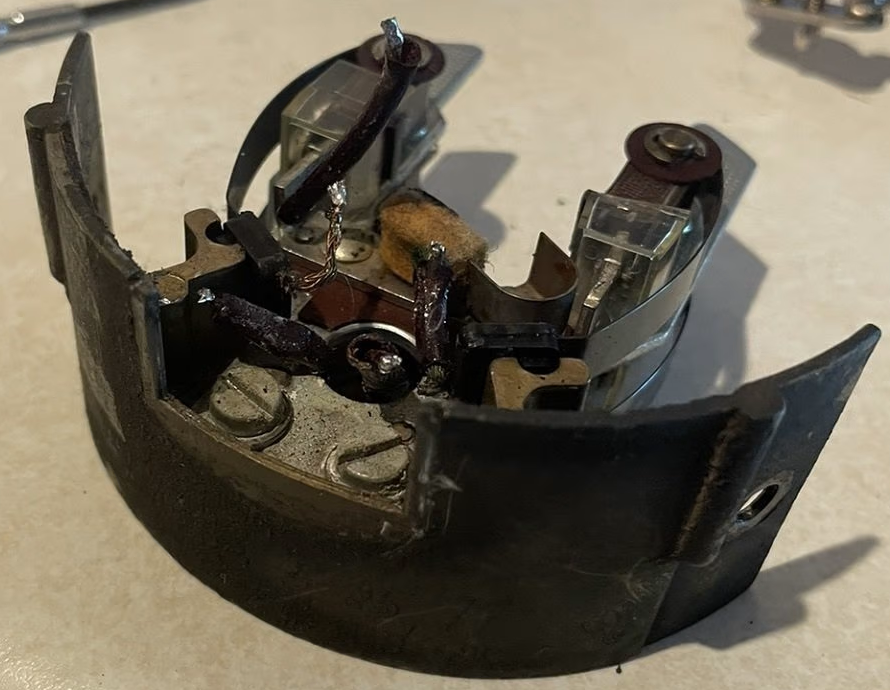
Here is a look at how the trigger points looked before the rebuild, also to document the wiring, which was also in poor shape with the insulation crumbling.


First step was to desolder the wires where they attached to the cable. The wires are resting in ‘U’ shaped metal prongs so applying a soldering iron and gently pulling the wire away with pliers was enough.

The cable lifts out of the body by working it on each side with a small screwdriver. Years of grime really wedged this in there good and it didn’t want to come out easily.
This reveals two flat head bolts. Removing those allows the silver part holding the points to be removed from the brass part. As the parts are separated the ends of the springs can be eased out of the grooves they sit in.

Next I cut the old wires off leaving about 5mm of wire.

The blocks are riveted onto the springs. I used a Dremel with an endmill bit to grind down the end of the rivet that is easily accessible.

This doesn’t release the block from the spring. To do that I worked a small screwdriver inbetween the block and the spring until it popped apart.
I used a 1/16 drill bit to drill a hole through the rivet.


Using a small screwdriver I worked it in-between the block and the three small metal parts attached to it working them until they became loose enough to separate. I always got the block off first leaving the three metal parts still held together with the rivet. Sometimes working these apart did the trick but other times I had to use my Dremel to cut off as much of the remaining rivet as possible. This was the most tedious part of the job.


I dropped all of the parts into a Ziploc with some Simple Green and ran it through my ultrasonic cleaner.
I used an M2x12mm machine screw (slotted pan head) and a nut to bolt the three metal parts, the block and the spring back together.

I used Permatex Green threadlocker to penetrate into the M2 thread. This product is rated for 2.2mm to 12mm so I figured it would be ok for 2mm. It is rated for up to 300F.

Next I cut down the extra part of the thread and filed down the head of the bolt as much as I could while still leaving a slot.

I soldered new 20ga stranded wire to the springs and the common connection, adding heat shrink to cover the connections.


I then reassembled everything applying SuperLube to the pins that the blocks pivot on. The SuperLube is dielectric and rated for 450F


The protective part of the cable had disintegrated where the cable bends leaving the wires unsupported.

I repaired this using some epoxy putty.

Next I reinstalled the cable and soldered the wires back onto the connector. I stripped long sections of wire, positioned the wire in the ‘U’ shaped prongs, applied solder and then trimmed the excess wire off.


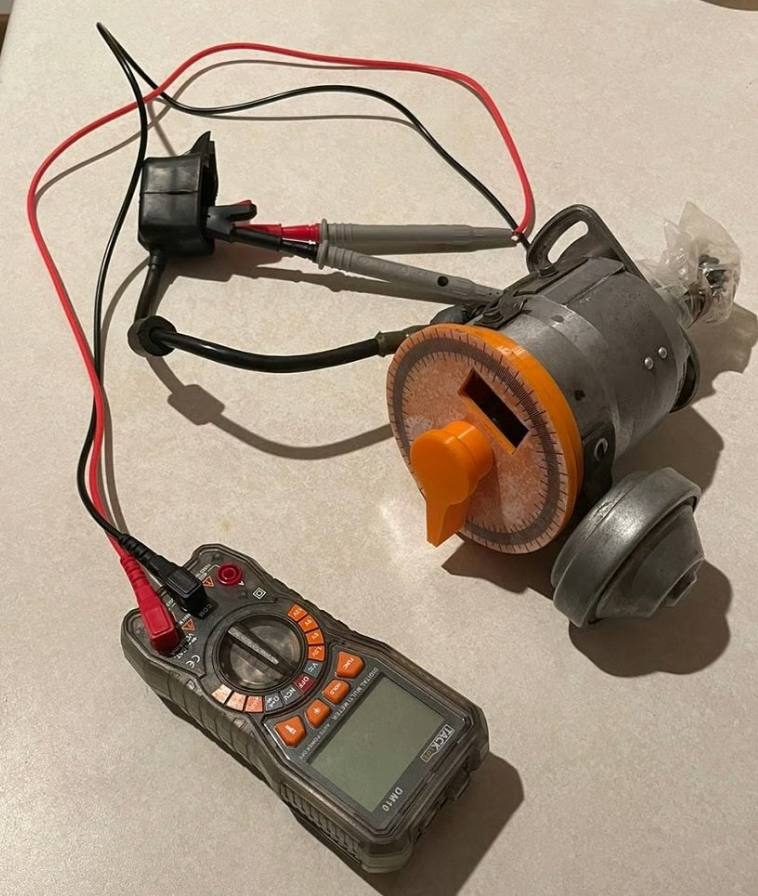
Here are my set of 3D printed tools for measuring dwell, along with feeler gauges. For the circular dial and pointer see: Measuring Distributor Trigger Points Dwell. The red object is a 3D printed version of @nordfisch ‘s measuring tool.

The relationship between contacts and connector pins is as follows.

Here is the dwell measuring being performed. I kept bending the brackers holding the blocks with pliers, reassemble into distributor body, measure and the disassemble and try again.
Final dwell angles were 136, 134, 121 and 132.
Final step was to grease the blocks with SuperLube before putting the trigger points back into the distributor.

Comments are closed